Esthetician, ALICE, @ Kenneth's Hair Salons & Day Spas/Mill Run, performed a Jane Iredale makeup application on me to show me what difference this mineral makeup can make!
Currently, I wear Laura Mercier, Aveda, MAC, and some Jane Iredale makeup. My skin has a lot of pink and red undertones throughout my face, with blue around my eyes giving me a darker cast around my eyes. As a makeup artist myself, I am always interested in learning more makeup lines and new tricks for better application.
Here is my before picture with no make up on....scary!
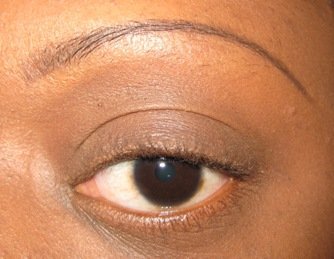
Here is my transformation that ALICE did with Jane Iredale makeup
Here is what ALICE used to achieve the look she created:
First she used a product called ABSENCE with Jane's Foundation Brush. This product controls oil and prevents shine in pictures from camera flash.
Liquid Minerals (radiant) was applied next with the same foundation brush. This product has a plumping serum and contains CoQ10, a potent anti-oxidant.
Here is a chart about the science behind the Liquid Minerals
Next ALICE applied Jane's Circle/Delete #2 with using Jane's Camouflage Brush. This product contains jojoba oil and is great for dehydrated eyes.
Jane's PurePressed powder in Amber, was applied next with Jane's Handi Brush. This flawless, lightweight mineral powder contains SPF 20!
Jane's Balance Spray is sprayed onto the face after each step of application. This product contains anti-oxidants, finishes and sets the makeup leaving it feeling like skin. Smells wonderful!
Brows: ALICE used a light matte brown powder with angled brush to define brows, then went over brow hairs with Jane's clear brow gel called browfix.
Eyes: ALICE applied Canvas lid primer, then applied Jane's gold shadow to lid. In crease, Jane's copper eye shadow. Highlight, Jane's Oyster eye shadow. Liner, Jane's cream to powder charcoal & truffle blended into lash line.
Mascara: Jane's lash lengthening mascara in Jet Black to help define my eyes and appear wider.
Lips: Jane's PureGloss in cotton candy....feels great!
Cheeks: Makeup Forever No 99, Scarlet Matte Red/Orange. Jane's oyster eye shadow was used as a highlight on my cheek bones and bronze moon glow was used to contour my cheek bones.
Here is my after picture again
This eye shadow pallet, Artist Eyes #2 contains both the truffle color ALICE used for my liner and the copper color she used in my crease.
This chart is helpful in figuring out which colors and products work well together with which types of skin tones.
This is an amazing before and after picture showing the coverage that is achievable with Jane Iredale makeup.
This is Jane's Sweet15 pallet. Includes 15 eye shadow colors, 3 blush colors and 3 lip plumper colors.
Here is a picture of Jane's foundation brush.
Here is a picture of Jane's Handi brush, excellent with the powder foundations.
If you live in the Columbus area, go to:
Kenneth's Hair Salons & Day Spas/Mill Run
3610 Fishinger Boulevard
Hilliard, OH 43026
614.538.5800
www.kenneths.com
Ask for ALICE!
Thursday, February 24, 2011
Monday, January 17, 2011
Eyebrows....the dos and don'ts
Oh Angelina Jolie! Yes, she has beautiful brows too! I loved this picture because of the lines for measuring and the numbering. Number 1, you want your brows to start either directly up from the flare of your nostril or from the start of your eye (depending how wide your nose is). Number 2, you always want your arch to be angled out from the outside of your iris of your eye. Number 3, your brow should end diagonally out from the flare of your nostril.
I love this picture because she demonstrates how beautiful full, natural, but cleaned up brows can look! Gorgeous!
This picture is wonderful because it is a close up so you can see if you held something straight (like a ruler), from where her brows start, it is a perfect clean angle to the arch! A lot of waxers, tweezers, threaders don't get this line/angle this perfect.
Natalie Portman! Some eyebrow shapes will be more straight, and that is fine. Better to have clean, fuller, more straight brows, then too thin!
These brows are beautiful too, but can you tell that her right one (our left) is thicker than her other one? It is very important to make sure our brows match. So if I were her, I would have shadowed in the thinner one.
Kim Kardashian! As you can see has beautiful brows both naturally and filled in to complete her make up application.
If you need help with correct shape, there are wonderful stencils you can buy and use at home. See how she already has plenty of hair, I would recommend using a shadow and angled brush. If you have a whole or missing hair, then I would use a pencil.
A lot of blonds think that since their hair is light, that means their eyebrows should be light too. As you can see, Gwen Stefani looks much better with eyebrows we can see. Here's a little tip! ... If you do your makeup and stand across the room and look in a mirror....if you can't see your eyebrows, they are too light!
Here this girl is using a straight pencil to measure where she wants her brows to start. Since she is missing hair there, she will use a pencil to connect to the hair she has.
I don't know what this guy was thinking? I do see a lot of girls walking around with these brows too. This shape is just not correct. There shouldn't be a thick boxy amount of hair that then thins out over the entire eye. The shape should start out thicker, then gradually angle to the arch.
This girl has what is called "comas". She is beautiful, but her incorrect eyebrow shape takes away from her beautiful features. Also, her eyebrows are way too far apart, making her eyes seem even farther apart. If she was my client, I would have her try woman's Rogain for awhile and look for growth. If her hair didn't grow back, I would take off the hair that is not in line with the rest of her shape. Brows shouldn't dip down that low. Not sure how this got started????
This girl has created her own shape! It's called....crazy! Apparently she wants to look like a cartoon or something?
This girl not only has too thin eyebrows, her arch is not correct. She has more of a "rainbow" shape, than an arch from the outside of her iris of her eye. To me, it looks like she is penciling in her eyebrows, so I would have her get a stencil and show her how to correct her shape and make her brows a tad thicker than how she is drawing them on.
Here again we have some incorrect shape and more cartoon looking eyebrows on a living human being!
I just needed to show another correct shape after all those incorrect brow shapes! lol
Here is another diagram. This one is showing how to achieve correct shape, based on the eye alone. This does work in come cases, but I almost always base my shape off of the person's nose!
Any questions, please contact me!
Have a blessed day!
Sunday, January 16, 2011
bikini waxing
The pink shapes display the different options
This chart really helps to explain everything every well & list all the different options that are out there for a bikini waxing service.
This chart displays your different options for your Brazilian waxing service.
I also had many requests for the lightning bolt!
Most bikini waxes look like this after the waxing service is over, but you have the option in what you want.....shape, amount of hair remaining, etc
Bikini or Brazilian waxing, I definitely recommend the leg up position in pulling certain skin tight! The tighter the skin, the less it hurts!
Make sure whoever is doing your waxing is definitely wearing gloves!! Also make sure they are NEVER double dipping with the same stick!
If you are ever in for a waxing service and the wax pot looks like this.....leave!! I can guarantee that this wax is contaminated! Contaminated wax means you could get an infection or worse!!
Never had your back side waxed? I recommend it! The wax service is super fast and not painful at all (at least if it is done correctly). Don't be shy. You will love it!
For more questions, reading, pictures....read my Brazilian and male Brazilian waxing blogs.
Friday, January 7, 2011
Male Brazilian or Manzilian
Male waxing, including Brazilians for men, has become more and more popular and a more requested service!
Not everyone is trained or knowledgeable on how to perform a safe male Brazilian wax, so I decided to blog about this service!
........First of all.......what does the Brazilian wax mean?.........
So this sign says it all! It is a preference really. Everyone is different and wants different things, so make sure you are asking your client and knowing what they want. Some want a strip of hair left on top, a shape, or nothing at all.
For the male Brazilian wax service, you have to use HARD WAX! You can use soft wax/strip wax on the butt cheeks, but for the crack and front side, you must use HARD WAX!
Cirepil is a wonderful cheaper hard wax. As you can see it comes in beads and is easy to fill up or refill your wax pot as needed. Hard wax is to be a thicker and cooler temperature than soft wax. If your hard wax is running off your applicator, then it is WAY too hot to apply!
So the wax stick/applicator in the second image is soft wax because of the consistency. It is running right off and drips very quickly!
If you have not been to a training seminar/class on Brazilian waxing, there are DVD's you can purchase on-line to help you perform a safe Brazilian wax.
Satin Smooth is another great wax that comes in a variety of aromas in both hard and soft wax. Satin Smooth is also a very inexpensive, but effective wax.Male waxing is not always offered, so do your research ahead of time so you know that you can get your services done. Also, find out how long the service provider has been performing male Brazilian waxing services.
As safety is extremely important when waxing anyone, making sure that you are safely cleaning the freshly waxed area is very important too. Here are a few inexpensive antiseptic (natural antibacterial) choices to use on clients after waxing and for home use as well.
I use Aveda's oils because they are safe to use directly on the skin. Tea Tree is my favorite go to for acne and after waxing care to help prevent bacteria from getting into the pores and follicles.
If you or your client do not care for the Tea Tree aroma, Lavender oil is another option that is a natural antiseptic.
Sandalwood is another option to use after waxing or extractions of blemishes. Sandalwood is awesome because not only is it a natural antiseptic, it also has anti-inflammatory properties! So whether you have done extractions or waxing/tweezing....you or your client might be a little red and swollen. Why not use a little Sandalwood oil on them to help calm everything down?
Hope this was helpful for people! Remember, get educated first before attempting to wax someone or yourself. It's much more involved and harder than it looks!
Subscribe to:
Posts (Atom)